Tuesday, 27 June 2017

WEEKLY ART PROJECT #36; CYCLAMEN

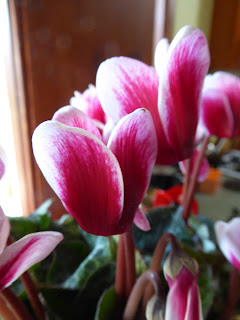
Okay, I must admit that cyclamens do not grow in my garden!
I've tried growing them, but they haven't managed to last very long.  
Because I LOVE cyclamens (especially red ones), each year I treat myself to at least one pot of them.  Therefore, whilst they may not technically be in my garden, they are, in a broader sense, an annual 'garden' experience for me!

I was hungry for a lovely deep red one when I came across this beauty & decided to bring it home.

From the several photos I took of it (with my rapidly ailing camera!), I chose this image to work from.
Off to the workroom I went...Hi Ho Hi ho it's off to work I go...!

Because I have got into a pattern of whipping out the copic pens the minute I sit down to start exploring, this time I decided to shake things up a bit &  to explore with paint from the outset.  My first little sketch (top left) really pleased me, & the seed of seeing how I could translate this into a stitched piece began to grow.

My final little painted sketch, was the one I decided to work from.  I liked the soft brown with the pinks & reds & just hoped that I could find the right colours in my fabric stash!

This was the closest I could get.

There were a couple of ways that I could have tackled this design.  I could have had the white fabric as a lower layer, & use the deepest reddy purple as my top layer before cutting my way down.  OR I could do what I chose to do...have the white as the top layer.  The technical issue with using white fabrics on top of rich colours, is that the under colours show through & muddy the white.  The way to fix this is to line the white fabric, or give it a layer of paint afterwards.  I didn't do either, because time was short & this is an exercise!  Nevertheless....it was important to stop, think & acknowledge that if this were a real art-piece-making session, I would need to take the time to do that!

I drew on my cutting lines & you will notice that I drew on far more than just around the stitched lines! This is because I was about to do this....

...cut away to the background & keep the positive shape in tact for all the layers.  This is because I was about to do something else outside of my usual practice!

I carefully cut back all the 'petal' layers to the base pink, at the same time!  What I now wanted to do, was build those layers back up to cut back, one at a time.  I wanted to reverse applique before appliquing to reverse applique again!  Phew....confusing!!!

I had 4 additional colour layers for the petals.  This is how they built up...and cut back!!

This is my final result & although I am a bit frustrated that I didn't get a more accurate length into my flowers, I am very happy with the colour choices & method I used to achieve that painterly look.  It is also a shame that there wasn't a softer brown in my stash, but as I keep reminding myself....this is an exercise!

Speaking of which, I am respecting even more now, the value of producing at least one small sample when about to launch into a body of new work.  It is something I have tended to do as a matter of course for my bigger pieces, but this process is so fabulous for identifying potential glitches that I am more enthusiastic now about investing the time into that preliminary exploration.  I hope it is inspiring you as well!


Wednesday, 21 June 2017

WEEKLY ART PROJECT #34 & 35; TWO FOR ONE


In an effort to get back on track with my weekly art project, this week I chose to do TWO projects in one (and a bit!) days.  As they have some similarities, I thought it would be fun to pack them neatly into this one blog post!

Sometimes we need other means of seeing to REALLY see!  This is as true in life as it is in art.

That was the case whilst working through the process of the last weekly art project. I noticed a section of leaves in one of the photos that had distinct possibilities for a little textile oriented exploration!!  When I went to take specific photos of the plant, I was overwhelmed with the possibilities that light & shadow had to offer me, so I took several photos.


Back inside and at the computer screen, I shortlisted my favourite spikey-leaf photos down to 4, printed them off on a single sheet & took them into the workroom to begin the process of design .

What interested me were the shapes created by light & shade.  Initially, I just used my black copic pens to create a few linear & mass observations.  From those I chose one to play with further, but as you can see, I could easily have taken each observational drawing onto the next level.  For the chosen one, I added a little colour.  That particular area of the photo had shown a yellow/green in that one spot, as opposed to the grey/green of other leaves.

Out came the green scraps!
I do have a lot!

I wanted my background to be a mish-mash of greens, so with that in mind, I collaged together a few different green scraps to form my background 'fabric'.

With the design stitched through the sandwich of layers, I used my white iron-out pen to mark where I needed to cut.  There were only a total of 4 layers (including the black top), so there really was very little cutting required.

This is the result.  Whilst I would certainly make a few changes if I were to do it again, look what this becomes when I use it as a repeat pattern....

...pretty cool huh!
So that was my first WAP done & dusted for the day.  Now it was time to get on with the next one!

Inspired by another spikey plant, I used this photo of our flowering cactus as my source of inspiration.
I realize that the eye catching feature here is the flower!  However, I am actually enamoured with the spikes, especially the curved ones!

But what to do to express the essence of that photo!  Out came my usual mapping tools to note down in a visual form WHAT I saw.  Those notes/marks became motifs & eventually a pattern.

Raiding the scraps again, I came up with this combination of fabrics.  The piece on the far right, is the sleeve of a mans shirt & those white splatters are similar to the white layer of star shaped spikes under the brown ones on the cactus.

This was the fabric I started with as my base & the first thing I did was create some of those white spike stars!!

The top layer this time was a composite 'fabric' again, made up of stripes much as I had done earlier in the day when I created a green one to use as a background.  I chose to have a multi coloured top layer, because if you scroll back up & look at the brown cactus spikes, you'll see that they are different shades of brown.

This is how it looked once each layer was cut back.  I am very pleased with the effect of the multi-coloured layer & think it looks very effective.  Whilst I am very happy with how this looks, I do cast my mind back to the original photo & wonder how it would look if I DID insert a flower!

A quick snip with a few scraps & I place these circles on my spike-inspired piece to see if it works.  NOPE....it doesn't!  That's okay though, because look what happens to my newly made  design when I turn it into a repeat pattern...

....much more interesting wouldn't you agree!
I must admit that I was having so much fun with my 'layout' app that I...um...(cough)...spent quite a bit of time rotating, flipping & multiplying my design & came up with LOTS of potential options!

Two WAPs in one day means that I have successfully caught up! Yeehah!

Till next time folks!


Saturday, 17 June 2017

WEEKLY ART PROJECT #33; WHAT THE PRESENT MOMENT CONTAINS


'Whatever the present moment contains, accept it as if you had chosen it.  
Always work with it, not against it.  
Make it your ally, not your enemy.  
This will miraculously transform your whole life.'
                                                                                 Eckhart Tolle

Well....I'm waiting for that 'miraculous transformation' to happen, but I must admit that having a more 'go-with-the-flow' attitude the past few weeks has helped me tolerate the fact that I am two weeks behind on my weekly art project!

Some people refer to these commitments as 'weekly art challenges', in fact I probably have at some stage.  That is because  choosing to maintain a disciplined practice IS a challenge.  Sometimes other priorities just have to supersede the discipline though and that has been the case for me. 

Friday afternoon saw me attempting to make up for lost time.  It coincided with a number of buds appearing on one of our cacti/succulent plants. They are a fabulous shape, which inspired me to take a closer look.

 I was immediately attracted to the hill-like patterns, reminiscent of scales on an armadillo.  It also intrigued me that each 'scale' was trimmed with such a dramatic colour contrast. That closer look inspired me to have a go at developing a little 'something' from it.

It was time to get the pens out to play.

My first exploration was an effort to get to grips with the form & the context from which this bud arose.
My 2nd attempt was a focus on pattern.
Keeping in mind that I was aiming to produce a 15cm square piece using contemporary reverse applique, I needed to be mindful of what was physically possible to produce within that space...& what was not!  
As you can see...my explorations took me further away from the overall shape of the bud, and closer to the patterning.

The colouring of the bud was quite dramatic & I had a few fabrics which colour matched well.  Earlier in the week, a friend had given me a pile of curtain fabric swatches.  One had a bold leaf pattern, so I chose that as my background.  It  coordinated & gave relevant interest.  The top layer, which would provide the creamy outlines of the 'scales' was calico.

Once I had sewn the pattern through the sandwich of layers, I used my air erasable pen to prepare for the first lot of cutting back.  This is my favourite part of the whole process!

You will notice that I have cut back more than one layer here!  Once the 'scales' had been revealed, I then drew on the edging shape of my bud & cut all the remaining fabrics back to the background.  This ensures that the form is maintained.  You'll see what I mean with the next photo.

After cutting back a few more times, this is what my bud looks like.

I am very pleased with the colour choices & it's off-centre placement.  However, I'm not so happy with how it's edges melt into the background instead of popping out.

I COULD have edged it all in the cream, but I think  the shape would actually have been lost in the process of doing that.  It would have been all about the pattern.  By not having the whole form outlined in cream creates variation & therefore more interest.  Another thing I could have done, is create a second 'outline' layer, which is something I have used before to good effect. That would certainly have worked here too.

But...I didn't choose to do that, so what other options do I have?

I chose to outline it with fabric marker pen!
It has popped the bud, so that it is clearly in the foreground against a more definite background.

What a fun little exploration to get myself  back into my weekly art project.