Monday 3 June 2019

TOMB MONKEY. (Weekly Art Project #21; Inspired By Travels In Egypt)

Even though I love to be near water, I am, most definitely, not a boat person.  Cruises on massive oceanliners do not appeal to me in the slightest.

However, a gentle float down the Nile on a Dahibeya was an experience I was very willing to try!

Having loved the exciting escapades of Amelia Peabody in Elizabeth Peter's wonderful books, there was no way we were visiting Egypt without  time on the Nile in an Egyptian style sail boat. Lounging on the open-air deck, listening to an audio book of David Suchet reading Agatha Christie's 'Death on The Nile', whilst watching everyday life happen on the riverbanks, has to be one of the most memorable relaxing 'holiday' experiences of my life.

It wasn't all laid back laziness though.  One of the attractions of this particular tour was that each day we had an excursion with an expert to a site quite often not easily accessible by road & tour buses.      
The inspiration for this week's art project comes from the Tombs of Al-Kab.

After disembarking we followed a dust track through farmland, past camels, buffalo & sugarcane to to a series of cave tombs. These tombs are unusual because they are on the EAST bank of the Nile, usually tombs are on the west, because the sun sets in the west. The ancient Egyptians believed that man was like the sun; weak when it arose (born), strongest in mid life & getting weaker again as it sinks into the west(heads towards death). However, Al-Kab chose to put their tombs on the East bank because their location was very susceptible to flooding & they wanted to protect the tombs. They are, however, facing west.


We were able to visit four tombs & once again, I was overwhelmed with what a privilege it was, to see something so old yet so spectacular.

In one of the tombs the paint work was white, not coloured at all, creating a very graphic dimensional effect.
       

One of the images was of a monkey eating a date from a basket.  I've always had a soft spot for the Primates, (when my friends had their walls lined with horse posters, mine had chimpanzees!) This particular monkey brought to mind the first Indiana Jones movie when the poor little monkey ate a poisoned date!

How could I not have this little character as my muse?!


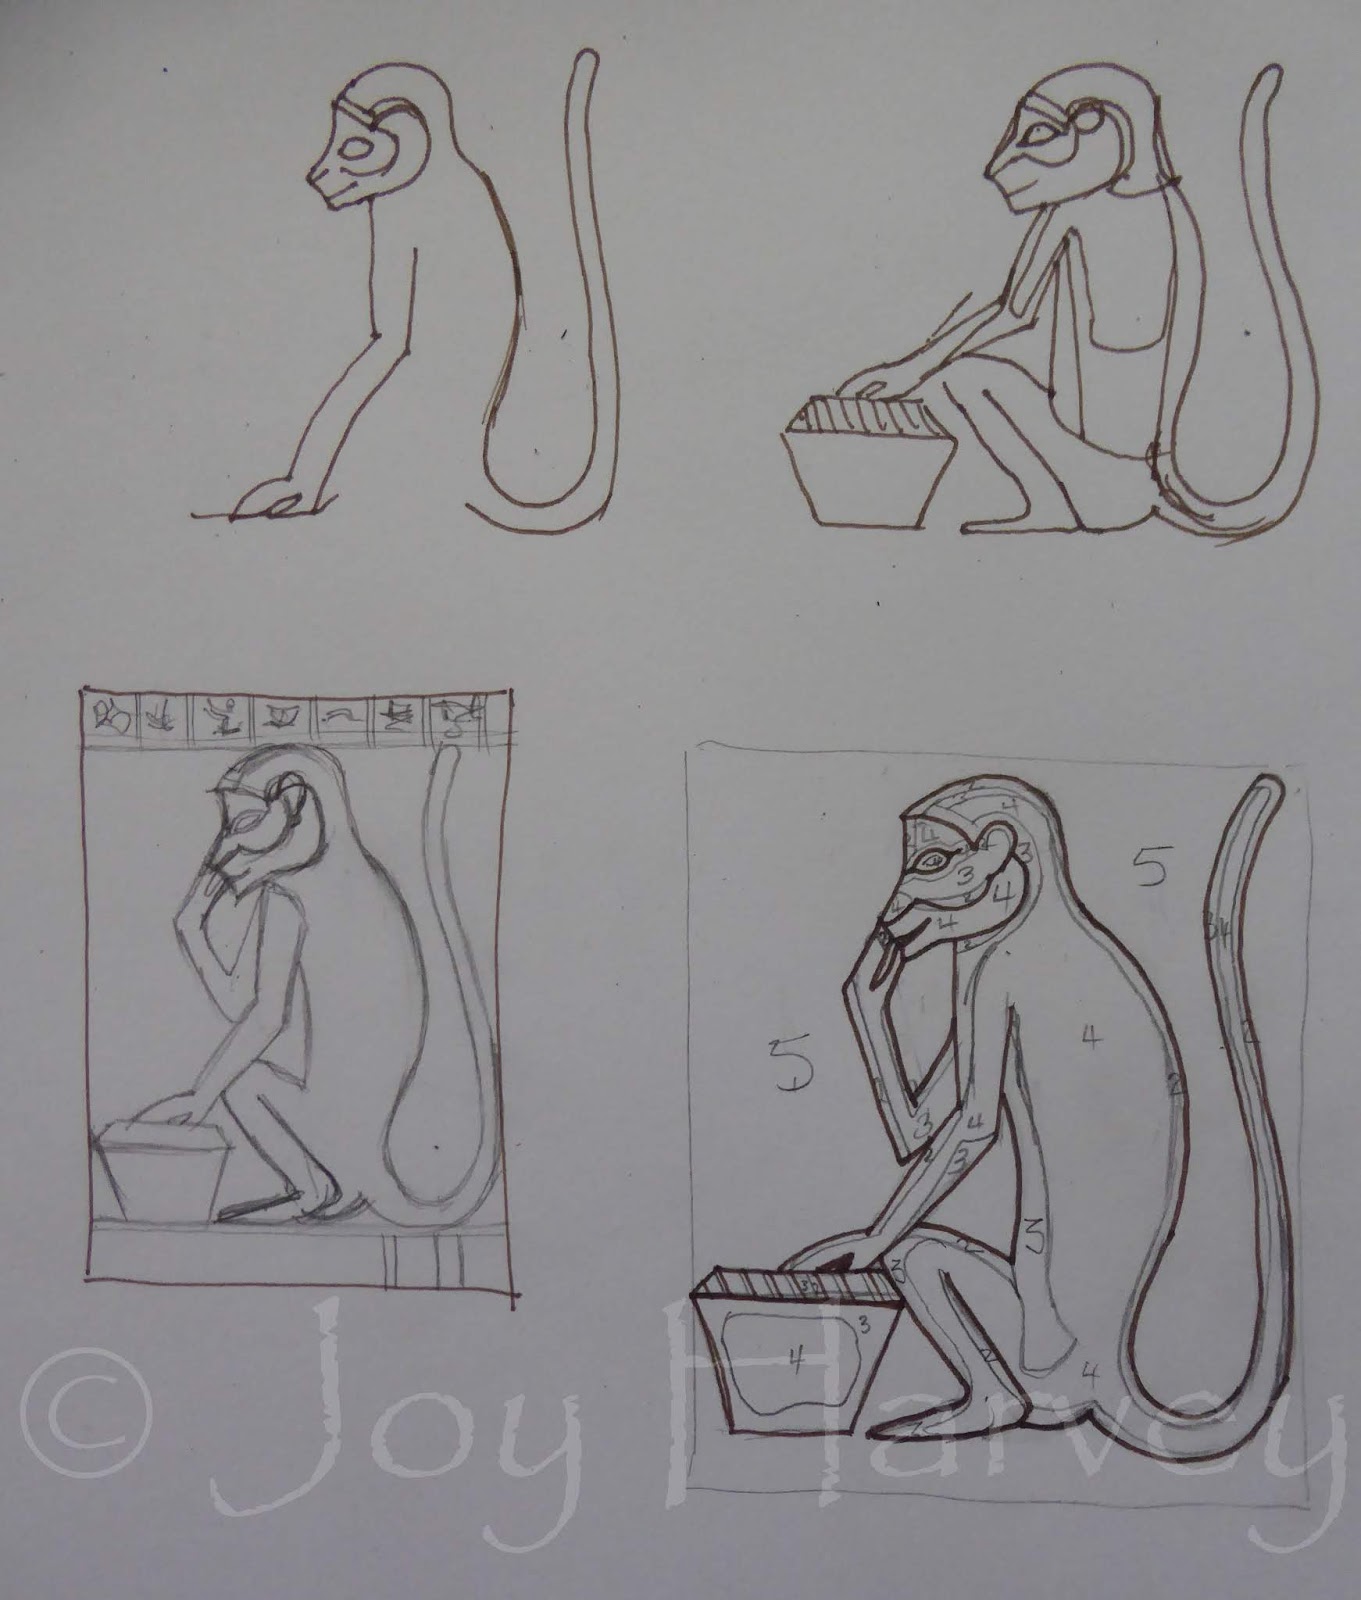
Using both of the photos above as my guidance, I put pen to paper to try & get my head around drawing a monkey!! (It's been a while!)

I was aware that my monkey would fit into a square shape more easily than a rectangular A4, so eventually I opted to create an square within the rectangle, which allowed for a border top & bottom.  This allowed me some leeway to create a bit more interest.


Fabrics chosen, cut, ironed, stacked & the design sewn through.  It was time to cut back!


So far, so good.  I was very happy with how this little fellow was coming along.  It was now time to think of tweeking to add interest. 

Using a brown fabric pen I drew in some partial hieroglyphs at the top. Partial because I didn't want them to detract from the monkey.  If they had been full, I think the eye may have been more drawn to working out what they were & what they might mean.  This way they are there & cropped to indicate they aren''t the important focus here!  Well...that's my reasoning anyway!!

I am so happy with him. He is a charming reminder of that wonderful visit.
Because I just couldn't help myself....


.... here is what a repeat image of the monkey looks like in my 'layout' app. I was disappointed the border didn't fit in, but I am still delighted with this outcome!


Monday 27 May 2019

ANOTHER LOTUS PILLAR (WAP #20; Inspired by travels in Egypt)


After a short but refreshing break away, I returned to my workroom this week & got straight into my weekly art practise.  Once again I was drawn to the Temple of Khun in Esna & the lotus pillars, which were different in style from those I'd seen elsewhere.   What impressed me about this one, was that colour was still evident. I also liked the way the lotuses were placed in rows to create a border, as well as some height & interest alongside the feather-like leaves. I was also intrigued by the barely visible painted patterns between the lowest row of lotuses.

Over the past few WAP's I've been experimenting with using the top level of my 'sandwich' of fabric layers as background or outline for my contemporary reverse applique designs.  For this week's project I want to complete this sub-theme by using that first layer as both, within the one design.

For a change, I used felt tip markers to make my visual notes today.  It is quite interesting using colour immediately & seeing the way different colours, even in this quick & sketchy stage, interact with each other.  It was also a good exercise to practice using a colour other than black as an outline from the start.


The design had been developed, drawn up to A5 size, the fabrics were chosen, cut & ironed before layering up & stitching. It was time to now begin cutting back!


Over the past few weeks the colour in my WAP designs have been very flat, with little textural interest.  This has resulted in a more graphic style, which has been the intent.  This time however, I wanted to keep the colour flat, but introduce a bit more texture into my fabric choices.  Therefore, the 'white' layer was a heavy hessian weave curtain sample.

 Alas...the fabric swatch was not big enough to fit a complete piece under the other layers as I would have liked, so I had to cut pieces to the approximate size & carefully place under the top layer in the appropriate spot before securing them with the outline stitching.


The difficulty with placing small pieces of that thicker fabric so high up in the stack of layers, is that it showed & created a white line when I cut back to other layers.  Whilst this is ok for an experimental piece like this, for a more finished presentation it would have looked better as the lowest layer....which is where it would have been if it had been a bigger piece of fabric!!


It is hard to see in this photo, but the red fabric is covered in gold glitter, which attracts the light & sparkles!!


It is hard to see in this photo, but the mustard yellow fabric has a pattern of looser woven squares throughout it.


The finished piece, embellished with a little stitching & a few beads.  I'm quite pleased with it & think that using the topmost layer as outline, filler & background components within the same design has proven to be quite effective. Next week I'll move on from Esna & I think it's time to move on from such flat designs as well!Before I go though, here's what this design looked like when treated in my layout app!

Creating is such fun!

Tuesday 14 May 2019

LOTUS PILLAR OF KHUN (WAP #19; Inspired by travels in Egypt)

It was time to move on from Luxor, although we would be back in a few weeks time when to spend a few days on the other side of the Nile exploring tombs in the Valley Of The Kings.  Now though, it was time to head off to Esna where we would board a Dahibeyeh for a 5 night float down the Nile!

There was just enough time for a quick look at the Temple of Khun though!

This Temple is dedicated to the creator god Khun & has an interesting history.  The original was built by Tuthmosis 3 (the Pharaoh who liked collecting plants whom I mentioned a few WAP's back) & was then rebuilt by Cleopatra's family. Obviously it was eventually drowned in sand, because it took two archeologists 13 years to dig it out!!

Perhaps it was the time buried that left the tops of some of the pillars quite dark...or were they painted that way??  Whatever the reason, the black made them different & therefore interesting.  I had seen quite a few lotus inspired pillar tops already during our adventures, but this one was different, so I chose it as my muse for this week's art project.


Pen & paper & concentration.....three very important tools!


Once I had worked out a design that was feasible within my A4 size restrictions & for using contemporary reverse applique, I got my fabrics together & gave them a good iron!
Each of my art pieces has a layer of calico on the base & one of the first things I do is rule up those A4 borders, purposefully extending each line.  This is so that when I build my layers up, I can line them up more accurately. 


Over the past few weeks of art projects, I have been specifically focussed on positive & negative space, especially in regards to creating outlines.  Most of my work involves the top layer being cut away from the stitching to become the outline.  Over the past few weeks I've worked on keeping the top layer as background & mass & cutting away to reveal the layers below which then make the outline.
This week, I wanted to do more of that, but I wanted to have two layers of 'background' colour.  This meant that one layer's lines were stitched in first before I put the top layer over it, pinned it securely & stitched in those lines.
I had to really concentrate whilst doing this....no distracting coffee, chocolate or Fb feed interruptions!!


This was how it looked as I reached for my scissors & began to cut back!!


You will notice that I only cut back one section of the pale grey angles in the background.  This is because I immediately recognised that having them in pale grey  was not a good choice.  For my sense of taste & balance, I would have been wiser to slip another piece of black fabric under there .
However, because I hadn't, I chose to get the same effect by....ahem...cheating a little bit! 


This is how it looked once I'd painted those angled chevrons black! 
So much better, it gives a sense of depth, by optically pushing the lighter grey stems forward.  I am very pleased with this outcome & have had reinforced yet again, how valueable samples are when exploring new techniques & design ideas.
I'm LOVING this series of weekly art projects, partly for the memories it brings back, but also for the opportunity to use some of these designs & patterns in my own way.  I do hope you are encouraged to venture forth on your own art adventures as well.

Monday 6 May 2019

BORDER DESIGN (#18 Weekly Art Project; inspired by Egypt)


 After a few weeks break from my weekly art project, I was looking forward to returning to this discipline at the start of each week. 

When I walk into my workroom on a Monday morning, I'm never quite sure how the project will unfold & what the end result will be.  As this week's Monday approached though, my anticipation was tempered by the recognition that I was going to have restricted time due to other things in my life needing to be done! Therefore, I did a little pre-planning.

I chose this fragment of decoration on display in the Temple of Karnak, as my muse.  The engraved design has become quite worn over time, but it is visible enough to see that it is an interesting design to play with.


 Naturally I started with a simple drawing to get my head around what I was seeing.

Then, I jumped a few steps.  Instead of more drawing & playing, I immediately went to how can I do something fresh with this using contemporary reverse applique.  Into my head came the notion of Notan,  a Japanese design concept that uses a mirror image in light & dark within the same design motif. I have seen this effectively achieved in the felt work by local artist Maude Bath, but have never tried it myself.  I drew what I envisaged my motif would look like & saw the potential.


 I then took out my mobile phone, photographed the motif & put it through my layout app to get this repeat image.
This appealed to me very much & I couldn't wait to try it the very next day in my limited studio session.


 Monday arrived & so did another 'really-have-to-do-today' item for my list! Sometimes life just happens like that!  Knowing that the rest of my week was going to be just as full, I decided that when I DID get into my workroom, I would simplify the design even more & just make do with that.

Sadly, this meant that I wasn't true to the Notan concept, but was inspired by it!! Perhaps another time I will have an opportunity to give it a proper go.


 My weekly art project ended up being a mirror image of the motif in chocolate & blue.  I used a variegated blue thread to sew  the outlines in the chocolate fabric & a variegated chocolate thread to sew the outlines in the blue fabric. Although not very noticeable, it still added to the interest!!


 Having had an exciting outcome using the layout app with my initial drawing, I photographed my project piece to see what this would look like as a repeat pattern as well.  This is the result.


 Before pinning my WAP to the pin board, I thought I'd add a little embellishment...buttons, to make it less flat looking & give it a little personality!


To finish off, I tried the app treatment again & this is the result.
Much as I am disappointed not to have realised my initial plan for this week's project, I am pleased with what I got done in a limited time. I also love the potential of using a limited palette of light & dark within a repeat pattern design.  A good way to get back into the routine of experimenting with contemporary reverse applique!

Monday 15 April 2019

MORE BOTANICS (WAP #17; inspired by travels in Egypt)


Last week my venture through the travel photos brought me to the impressive Temple of Karnak in Egypt where I was particularly enamoured with the wall of carved drawings showing botanic flora & fauna.  These illustrations date back to 1425BC and were at the behest of Thutmosis3, who had discovered the plants & wildlife of Syria so fascinating ....as his troops were killing off the locals!

Such was the range of interesting plant shape that I felt one weekly art project was not enough, so I returned to this source of inspiration again this week & began by doing even more drawings.

After a couple of hours taking visual notes, I recognised that 4 sheets of A4 should provide me with enough data to create a composition!

That though, was the hard part.  I wanted to cram as much in as possible, but I also wanted a combination of plants that would look aestheticly pleasing.  I've been looking at a lot of Still Life paintings lately & that composing of elements is so important; various heights, shapes & a sense of flow with a quirky spot of interest here & there...all adds up to a formula that works


After much erasing & rearranging I finally had a combination of lines I was pleased with.  Wanting to keep colour minimal, I made my decisions, ironed' layered up & stitched the design in.

Then it was time to get the magic happening & let the cutting back begin.  Here's how it changed over the ensuing hour.


This is my end result & I am very pleased with it.  The style is so different from my usual work which of course, keeps me interested & engaged in what I'm doing. 
I've loved every minute of this focused period of time in this part of the Karnak Temple.  Next time I will look elsewhere in this temple complex for inspiration though.  I hope your own creative adventures are exciting you too.


Monday 8 April 2019

BOTANIC SAMPLER (WAP #16 Inspired by travels in Egypt)


Just down the road from Luxor is the magnificent Temple of Karnak.  Not only was this where we encountered a multitude of fellow travellers, but this temple complex was seriously overwhelming in both size & beauty.
It may seem ridiculous, but we were struggling to grasp that this was real....that these incredible buildings with their exquisite decorative features were so very very ancient, yet here we were in the 21st century walking around them! This wasn't a dream, or a book...it was sun, sand & stone! Real!

One of the parts of this complex that I most wanted to visit was the Botanic Garden of Thutmose 111.  This was a series of walls, which I imagine once surrounded a courtyard, at the back of the Festival Temple.  Here Thutmose had asked artisans to carve relief drawings of the many exotic plants & wildlife he brought back from his military campaigns in Syria.  It seems that old Tut was a bit of a Botanist, as he liked collecting specimens from all over Egypt as well.

When we finally found the right spot, the sun was very bright & it was hard to actually see the reliefs, and photographing them was also difficult...I literally couldn't see where I was pointing the camera! (I have a photos where heads are missing from birds etc!!!!)
With the few photos I have, I chose to make this collection my muse for this week's art project.

 First I needed to discover what I could from the photos with line drawings.  It didn't take long before I knew that I had more than enough to create a composition that might fit into an A4 size, so I started working up a design , erasing...and working up again!!!


Last week I had popped into Spotlight fabric store & couldn't resist this bundle of greens.  I decided to use them as part of my colour palette for this exercise.


Once the fabrics were chosen & the design was transferred to the top fabric, I chose a variegated neutral coloured thread to stitch in the design.  Then it was time to let the cutting back begin.  Here's how it went;


 Whilst I was pleased with the effect of the cutting back, it needed a bit more tweeking...


 ...so I added some handstitch. 
Hmmm, I still felt it needed more, perhaps more texture...more something.  How about more stitching into the background without cutting away?


 This is my end result & I'm happy with it.  I still feel that as an artwork, it is not finished, but as this is an exercise....it has been a valueable experiment.  I'd tried a similar variation of the reverse applique technique a few weeks ago using just one multicoloured fabric as the middle layer, so I really wanted to try using plain coloured fabrics, but a few of them! I really like the shapes of the plants & the simplicity of using blocks of colour like this, but to make it more interesting, I think adding the additional stitching helped.

I was very engrossed in this work & am so inspired by the Botanic reliefs, that I think I'll return to them again next week for more experimenting. Until then...happy creating!