Monday 26 November 2018

LITTLE HOOPOE (WAP; Egypt #5)


 One of the places I was desperate to visit before leaving the Cairo region, was the Ramses Wissa Wassef Art Centre. It is an award winning weaving centre which provides an income for generations of local women who learn to weave on site, & then are employed to weave. Ramses Wissa Wassef was quite a visionary, believing that children have within them a natural ability to create. One of his principles was that there be no patterns made to follow in the creating of the weaving, even the young children as they learnt would have to follow the image they wanted to produce...in their imagination. I had read about him via the internet & so wanted to visit this special place.

On the day we arrived, the weavers were having some time off, so I didn't get to see them at work, but I did have a wonderful stroll around their gallery shop.  Ohhhhhhh MY!  I would have loved to have spent a bit of money there!!

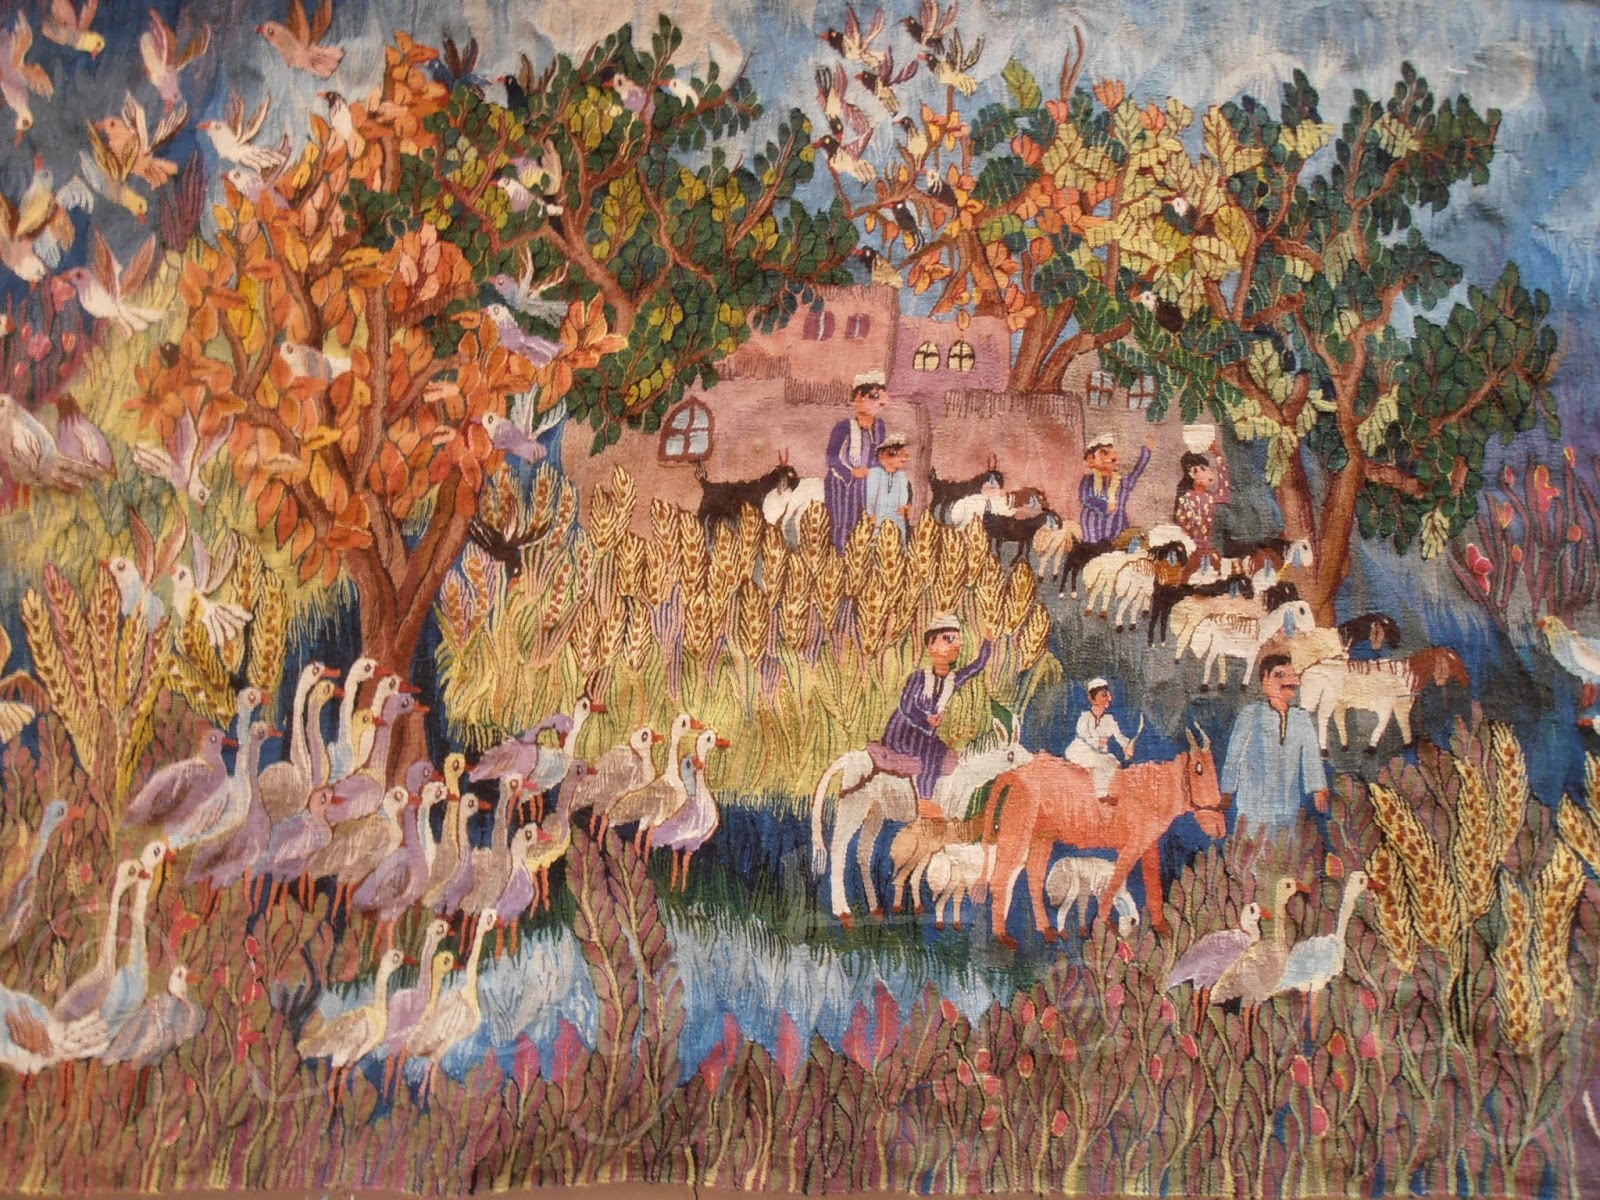
The stories told in the weavings were all about the everyday living of Egyptian life, that we had seen going on right outside our car window, as we traveled from one site to another.

They were not only beautiful, but complex visual narratives.  


There were many that I truly loved, but one little character that I was most smitten with, a little Hoopoe bird!


We had seen a couple of these birds in the grounds of Mena House on the first day we arrived & my excitement at seeing them scared the poor little birds away!  They are striking to look at & even when portrayed in a naive or simplified style, they can still be recognised as Hoopoe!

I wanted to enjoy my weekly art project time today, creating a simple version of this bird.


I started with line drawings using photos & pictures in books, as well as the Hoopoe bird in the weaving, as my source of direction.

Birds are not my forte.  They are not in my sketching skill set!  This meant I had to go over & over the shapes & lines again & again.  Keeping a design simple is not as easy as one might think!  In the end I took my ruler & drew solid lines & sharp angles through the mess I'd made on the page & was remarkably happy with the outcome.

Fabric choices for the Hoopoe came quickly, but oh dear...the background...took AGES!

It was a relief to finally get started.


After sewing in the design, I didn't cut anything back until I had drawn in my cutting lines with a white iron-out pen.  This is so useful as it gives me an idea as to how the outlines will look & whether I need to alter the width of any lines to create interest or effect.

At last it was time to let the cutting back begin.  here's how it went...


Isn't he cute!
I am so pleased with this little fella.
There are a few technical aspects of this piece that I am particularly pleased with. I'm glad I chose the wild background fabric.  It is from South Africa & was given to me by a friend who was actually born in Egypt, so there is a lovely personal connection there.
I'm glad I kept the Hoopoe simple & bold, otherwise he might have been lost in the dynamism of that background.
I'm glad I thought to angle my scissors in such a way that some of the white layer is seen as an outline to the black in the wings.  It is just a shame that I wasn't quick enough to think of angling the scissors the OTHER way for parts of the body!!!
It isn't obvious in the photo, but there are three layers of black in the sandwich of fabrics that were cut back to produce this Hoopoe.  One of those blacks is satin, so reflects the light.  This is what appears in the wing & tail feathers & looks effective.
The finishing touch is an eye made up of a button with a white pearl bead sewn on top.


Because I really couldn't resist, I put little Hoopoe through the app treatment & this was the fun result!!  Next week's art project will be inspired by something in Luxor. I'm looking forward to it already!

Monday 19 November 2018

SOLAR BARGE (WAP; Istanbul #4)


The Giza Plateau isn't home to just pyramids.
Also housed there is a purpose built museum where a Solar Barge rests in pride of place.
This barge, also known as the 'Khufu' Ship, is believed to have been buried in the plateau around 2500BC & was rediscovered in 1954.  However, it was no longer intact when it was found,  it was in 1200 pieces, which experts then spent the next 14 years putting together!! (I suspect they are all VERY good at jigsaw puzzles!!)

We were immediately amazed at the size of this boat & the elegant shape of it's stern & hull. I particularly liked the shape of the oars, the were like sharp pointed narrow leaves with long stems.

It was a very good exhibit to visit so early in our adventure in Egypt, because the image of this distinct style of boat, was one we were going to see many times over in tomb & temple art. 


The first tomb visit was the very next day!
The Solar Barge refers to the boat that carries the sun god (Ra) across the heavens each day.
However, even the boats carrying hunters & fishermen resembled the shape of the ancient boat we had seen.

The tomb carvings mesmerized me with their rich illustrations & use of pattern.  Regrettably we weren't allowed to take photos in the tombs, unless we slipped money to the guard.  Even slipping a few notes to the man guarding the Tomb of Ti didn't guarantee that my photos would be very good though!!


For this week's art project, I decided to combine the linear aspects of the background above, with the zigzag water & a solar barge.


I started with some very rough drawing notes using my graphite crayon, which, being quite thick...meant simple lines & little detail!  These look like  useless scribbles, but they were actually an effective means for me to capture the visual information I needed, in order to take this design making process further. 


My sketches progressed to sepia pens & eventually a splash of watercolour.
These were the bones of a design that soon came together .


Choosing fabrics didn't take long either, & my colour palette was chosen to represent the colours I'd seen remnants of in the tomb carvings.


I decided to bring my design to life in two sections, which would mean two different outlines.  The first would be the background section.  I stitched in the lines, but didn't immediately cut it back...

...as I wanted to first sew on the wad of fabrics that would become the barge & oars.  I chose to stitch these in blue to connect the boat to the indigo coloured water that would appear in the background.

It was time for the cutting back to begin...


This was the finished piece & I confess to not being totally happy with it.  I'm glad I went back & made the background lines thinner.  The width difference to the lines in the foreground add more interest, but even so, I'm not happy with the light stone colour in the background.  The foreground colours are too close in tonal value & create a heavy weight to the overall piece..  I also don't like the golden stripes I got a bit carried away with on the boat!!


However, when I change the proportions & shape of the completed piece, I like it MUCH better.  This is a  more interesting design to me now! What a great lesson about the importance of sample making & trying different formats out!

So, the only thing left to do...because I could see it was a design to lend itself to being a repeat pattern...was to try it out in the 'Layout' app.  Here are two outcomes.


In both of these, the stone background works brilliantly, as do all the additional gold stripes in the barge. So much potential from a design I could easily have ditched!  What fun!

Tuesday 13 November 2018

PLAYING WITH PYRAMIDS (WAP;Egypt #3)


A lot of people assume that there are only three pyramids in Egypt....these three that draw crowds to the Giza plateau in their droves. However, when we were there...we saw more touts than tourists and they desperately congregated around the pyramids trying to see their wares or a ride on the family camel!  
The sky was grey with a pollution laden fog creating a mystical atmosphere into which these three giant tombs arose. 

It was an amazing experience to get up close & see the size of the blocks the pyramids were made of, and to think about the people who built them. The word awesome is appropriate, as is "WOW!"!

It was also mind boggling to see how many other pyramids & partial pyramids there were throughout the rest of  the region too.

My favourite was this step pyramid at Saqqara.
We were the first visitors to arrive that day, so had the place to ourselves for a while.  This site began in the 27th century BC! That time scale alone completely does my head in!!  This was the prototype for all the pyramids that were to follow.

One of the things I liked about visiting on this particular occasion, was the scaffolding that surrounded it.  In fact...I took more photos of the scaffolding than I did of the pyramid! The workmen were attempting to stabilise the pyramid & it amazed me that they were doing so whilst balanced on such rickety looking scaffolding!

I loved the shadows & lines the early morning sunlight made on the pyramid, which in itself looked like it had grown directly up from the sand.

What a rich & precious gift, to be able to travel & see these ancient wonders.


From all the pyramid photos I took, this was one of my favourites.  Not only does it highlight the size of the pyramid bricks in the background & reference the touts offering camel rides, but I love the laughter of the girls on the camel's back & the way the colour of their clothes & the saddle blankets pop out in contrast to the sandy terrain & background.

How was I going to express all of these sights & experiences into one weekly art project?

By making a start!!


Just to break up the pattern I'd got into of always using black pen for my preliminary sketches, this time I chose to use water brushes & water colours.
They were quick visual notes & they did what I wanted them to do. They recorded colour & shapes.


Initially I thought I might try & do a camel face with a pyramid in the background, but then I looked closer at my camel photo & became more interested in the patterns of the saddle blanket. They may look like simple designs, but it took some time to record the colour pattern & placement. As I did so, I noticed that the triangular pattern reminded me of pyramids.

An idea came to me, I developed it & reached the 'rummage through fabric' part of the process!


I chose colours that represented those I had observed in the sand & pyramids, as well as the sky, which was often grey with glimpses of blue.

Using my black & white app, I checked that I had a good mix of tonal values & then cut, ironed & layered up, before stitching the design in.


This was the design I was working on.

As you can tell, I've combined the patterns of both saddle blankets into an interesting whole.  The top one would....obviously, represent the pyramids.  For the lower section,  I have turned the diamond pattern  on it's side to become squares.   I wanted these to represent the huge blocks the pyramids were made of.

It was time to let the cutting back begin.  Here's how the image above was transformed...


At last the final sections were cut away to reveal the end result.

You will have noticed that at one point, I changed the solid pale grey triangles in the upper pattern into half trainagles.  The reason for this is to make the remaining dark grey triangles more prominant by surrounding them with smaller sized shapes.  It also gave a better idea of a patchy sky!!

You will also have noticed that I have managed to reference the scaffolding from the pyramid at Saqqara by extending some of the lines by stitching into underlying fabrics.  This was a nuisance to cut out & did take a lot more concentration , but the result is definitely worth the effort.

I am so pleased with this outcome.  And I was delighted with how the concept evolved over the day.  It is a design I can imagine doing on a bigger scale, which could be quite effective.  The background layer of fabric is one that has a sepia coloured map on it, which was an excellent choice as it adds interest.
All  in all, a very pleasing project to start a very busy week with. Yeehah!

Tuesday 6 November 2018

MEMPHIS SPHYNX (Weekly Art Project; Egypt #2)


With our heads befuddled with jetlag, we set out on our first Egyptian excursion  to the ancient capital city of Memphis.  Well...to what was left of it...which wasn't much!

The day was as dreamlike & spacey as our heads. With a fog of cloud hovering just above the treetops it gave everything a softened colour palette.
We were there to meet Ramses the 2nd!  A formidable leader whom we were to recognise multiple times throughout our Egyptian adventure.  However, inspite of his grandeur & beauty, it was not him I chose as my muse for this week's art project.
In the open air museum that adjoined the building where Ramses lies, a multitude of full & partial statues are dotted around a palm lined garden. 


Amongst them is a magnificent Sphynx made out of calcite. He is believed to have been sculpted sometime between 1700 & 1400 BC.  That makes him incredibly old & outstandingly well preserved! Over time he has been weathered down, & rain stains have added an element of interest to his surface, so that he now looks like he is crying.
On closer inspection he still retains carved lines of pattern in his headdress, a woven effect in his beard & even the outline of claw nails on his paws.

He is beautiful!

I was particularly interested in the linear patterns in his headdress & beard, so wanted to work up a design that would highlight them.

Drawing time was a little repetitive, but it made me think about my composition & how I could proportion elements so that I could get the different line variations in AND represent the face.

Faces are very difficult in contemporary reverse applique & choosing which layer of light or dark goes where... is generally a nightmare.  In this case I kept the shading simple & layered it quite simply too.


The colour choices were easy.  I wanted to reference the colours of the day; sand, honey & softened greens!


Just to experiment with something different (& because I still don't have any grey thread) I chose to put green in the needle & was quite pleased with the effect.

It was time for the cutting back to begin....


And with some finishing touches...


...voila!
I had to squish the face up in my design process, so that I could get all of those different sized lines in & I am very happy with the outcome.
It was such a pleasure to revisit the Sphynx & to create have this little project piece to remember him by.  It was also REALLY good practice to look at & think about facial structure & shading.  A long day, but worthwhile.