Monday 29 May 2017

WEEKLY ART PROJECT #32; ROBIN IN A NEST

 Life is a bit discombobbled at the moment!
The living area of our house is being painted...as I type... & in the past few days I have been systematically emptying cupboards in order to move furniture.  Consequently my house is a MESS!  I didn't realise that I had so much STUFF! There is furniture stacked in every possible walking space & my current mantra is a reminder as to where I've put the teapot!  Layered on top of that, I'm still coming back down to earth after a wonderful holiday.

When I sat down to do my weekly art project yesterday, I  kept thinking about how magical it was to see so many Robins & Wrens hopping around when we were in Tasmania.  We have neither (live) in our garden...

...and have to resort to fake ones instead!  And so it was, that because we do have a fake Robin, I chose to have this bird as my muse this week.

Where to start????

With a blank page divided into sections & a few photographs to work from.  Out came my copic pens & paints & a blissful period of total absorption!  This is definitely a good way to take a break from the worries of everything else going on in ones life!!

The results of my efforts were these.  I had noticed that the leaf shapes of the plants surrounding my little bird were a similar shape to feathers, so tried to incorporate this idea into an abstracted version of my Robin.  I like the nest effect & wanted to keep that as part of the composition.  It was also fun to play with colour options.  We had seen both red & pink breasted Robins in Tasmania, whereas the Robins we had seen in the UK (where we lived for a few years) had been a more orangey red.  All of these thoughts & memories visited me as I sought to create a design that could be achieved in contemporary reverse applique, within a 15cm square & not take the rest of my life to complete!!!!!!

When I got stuck, I did consider just having the brush cleaning paper as the 'result' of this week's project!!!

Finally I did decide on a design & then had to consider colour options from my fabric stash.  I chose the third combination from the photos above.  It provided some interest & also incorporated the rusty colour & the plant greens from my original starting point.

Fabric cut & ironed, layered & the first lot of lines sewn in & cut back.  I had used the spotty fabric as my top most layer for that wonderful curvy nest. Before stitching in the next lot of lines, I made the most of my left over fabric to tuck in behind the top black layer.  You will see why soon!! You will also notice that I have traced my sewing lines on with a white iron-out fabric marker.  These pens are a god send.  I don't know what I would do without them.

I am very happy with how I've used the spotty & black fabrics here.  The photo doesn't show the dimensional effect, but there are 3 layers here, not 2!  The plain, texture-less red was doing nothing for me though, so I got the scrap of red that I had previously cut away and layered it in top.  Using the curved line of the red breast from my earlier explorations, I drew them in with the sewing machine & then cut them back.

This is the result & I'm very happy with it.  It may not obviously say 'Robin In A Nest', but that's ok!
This is my 32nd WAP & I have really enjoyed this week's efforts!  It has also reinforced to me the value of preliminary work, which is so useful as a piece progresses, to refer back to.


Wednesday 24 May 2017

WEEKLY ART PROJECT #31; THE VISITOR


It was Monday evening and my husband had just come home from work.

ME: Hey darling, come down to the workroom and see what I did for my weekly art practice today.
HIM: Ooo what did you do...did you do the possum?

He looks at it.

HIM: Ohh. Mmmm.  That's different.

He turns toward me.

HIM: I thought you would have done something about the possum.
ME:  Well actually...I did!

He was referring to the little furry visitor he had unearthed in the garden over the weekend. Annoying rodent that it is...it is also VERY cute.

But how did I get from this cute little native critter to that dark & foreboding blob design at the top of this blog post?

I began with a sketch....yes, I'm predictable!
The proportions were wrong & I had limited time, so I...
... used my computer to copy the photo into grey tones & then draw outlines over the top, which I then printed off & traced.

Not content with outlines, I started mapping the different colour zones, much as one would were I wanting to recreate this possum using fabric collage technique.

But I'm attracted to line & I was enjoying these line combinations for themselves, as opposed to what they represent.  There were WAY too many for a 15cm contemporary reverse applique piece in limited time though!

Out came the view finder, ie; a few scraps of paper to both block & frame small sections to highlight a potential composition!
The enlarged composition was interesting, but still too complex.

A few more enlargements & I settled on this.

A palette of colours were chosen and the sewing began.

Cutting back the first layer revealed a delicious shape & my inner minimalist would have been happy to leave it there!  However, I'd made a plan & I was going to stick to it!!

Cutting back the patterned fabric highlighted something that... in my haste... I hadn't taken into consideration.

The pattern print  doesn't go all the way through the fabric!  The underside is dramatically lighter than the top.  This means that when raw edges of cut material are left raw... as they are in this technique... quite often the paler underside shows.  Now this can actually  be used purposefully to create an effect, but it can also look awful.  It certainly wasn't a good look in this scenario, but...HEY...this is an exercise & we live & learn!!

The finished piece could have had some stitch added, but my time was short & I was happy with this curvy abstraction as it is.  It would have been interesting to enlarge & abstract even more.  It was a FUN process & it also distracted me from the dark, wet & cold misery outside!


ART & TRAVEL


Being an artist, I've found,  is not just a 'job', nor a 'hobby', nor even an 'activity'.  Being an artist is part of who I am, and like breathing is part instinct & part process and I can't (nor do I want to) do without out it. So when I tootle off  traveling, I take a few tools  to enable me to keep art making, in some form or another.

This morning I calculated that, in my 52 years,  I have traveled by plane 79 times!  Most of those trips have involved international flights.  What an incredible privilege each has been, yet as I am getting older & my tall body is getting wider...I am actually finding flying somewhat stressful...even, at times, near panic attack level!  The fact is that there is a lot of me to squeeze into an economy seat & as I am usually seated alongside at least one other bigger body, flying now tends towards the torturous!

I have, however, found a coping strategy!

 I doodle!

In my hand luggage, I now take a large pencil case which contains; an A5 size blank sketch book, a few copic waterproof black drawing pens of various nib sizes, 3 water pens ( I cannot begin to tell you how valued these are!), a small gluestick,  a 4 layer tower of Koh-li-noor paints and a paper serviette to wipe the brushes on!

When I get to my seat on the plane, this is tucked into the pocket of the seat in front, alongside the packet of mints, which I tend to consume in flight!  Once up in the air, my tray comes down & I start creating a doodle.  Being able to focus on this distracts me from my physical discomfort.  Phew!

It also means that once at our destination, I have those tools ready to sketch, or paint if I should feel so inspired.

Because I am textile oriented within that whole art spectrum....I also like to take something to stitch!  Some people enjoy inflight stitching, but I am too paranoid that I will lose a needle that I just don't even go there!

For the recent two week trip to Tasmania, I had a specific stitch project in mind (I'll post a blog about it when it's finished!) & took a small variety of fabrics, some blanketing & a minimal variety of threads.  In an old glasses case I take scissors, needles & an air erasable pen.

Sometimes very little of my art supplies get used.  Other times they all do! 

Regardless, I am always prepared, so that when that moment comes, that I can wrap myself up in a blanket, sit on a porch in the sunlight, and stitch, whilst robins & blue wrens hop about, and a little Bennets Wallaby nibbles away at a nearby bush... I can!


Monday 1 May 2017

WEEKLY ART PROJECT #30; I'D RATHER BE DOING SOMETHING ELSE!


Monday is the day I commit to doing my weekly art project exercise.

Yesterday was Monday.

Monday comes around REALLY quickly!

It was grey, wet, freezing and I did not want to leave my flannelette sheets in the morning!  I was also completely uninspired, distracted by other things happening in my life, frustrated that everything I do seems to take soooooooooo long to get done & generally....I was feeling stroppy!

All the inspirational & encouraging quotes floating around in the ether kept prodding at my attitude & phrases like 'just do it' & 'you have to show up' were guilt tripping me into AT LEAST making an effort.

So I did.

I donned my purple ugg boots, went out into the garden & took some photos of my dark purple salvia before the rain came in again.

If you have followed my weekly art project exercises from the start, you may have noticed that I have quite a few purple flowering plants!  That's because purple is my favourite colour!!  We also have a lot of red flowering plants too, which is my husband's favourite colour.  The yellow flowering ones are those we inherited from previous owners, the pinks are planted around my daughter's room & the whites are the neutral that go with everything!!

After printing off the photos which I felt provided most inspiration to proceed with, I began the process of visual note taking. Nothing I drew excited me or pinged any sort of real "oh WOW, this could work" reactions.  The next step to help prod those creative juices was to make a small view finder & start exploring differently!  I find this a helpful mechanism when I'm stuck.  Sure enough it gave me a few directions to wander off to...!

One direction was colour choice.  The printed photo included a reddish purple, which, although not true to the real flower, was none the less INTERESTING!  I fiddled around with a design possibility, taking far longer than I wanted & then rummaged through the purple fabric stash.  You'd think that someone who liked purple would have a really impressive purple stash! Alas...not me! Nothing seemed right...not purples, not greens, not greys, not black & whites!

Grump, grump, grumble grump!!

I pulled my self  together & just made do with what I had. Then I made a START!
I laid down the foundation/background first.  Very simple & basic contemporary reverse applique.
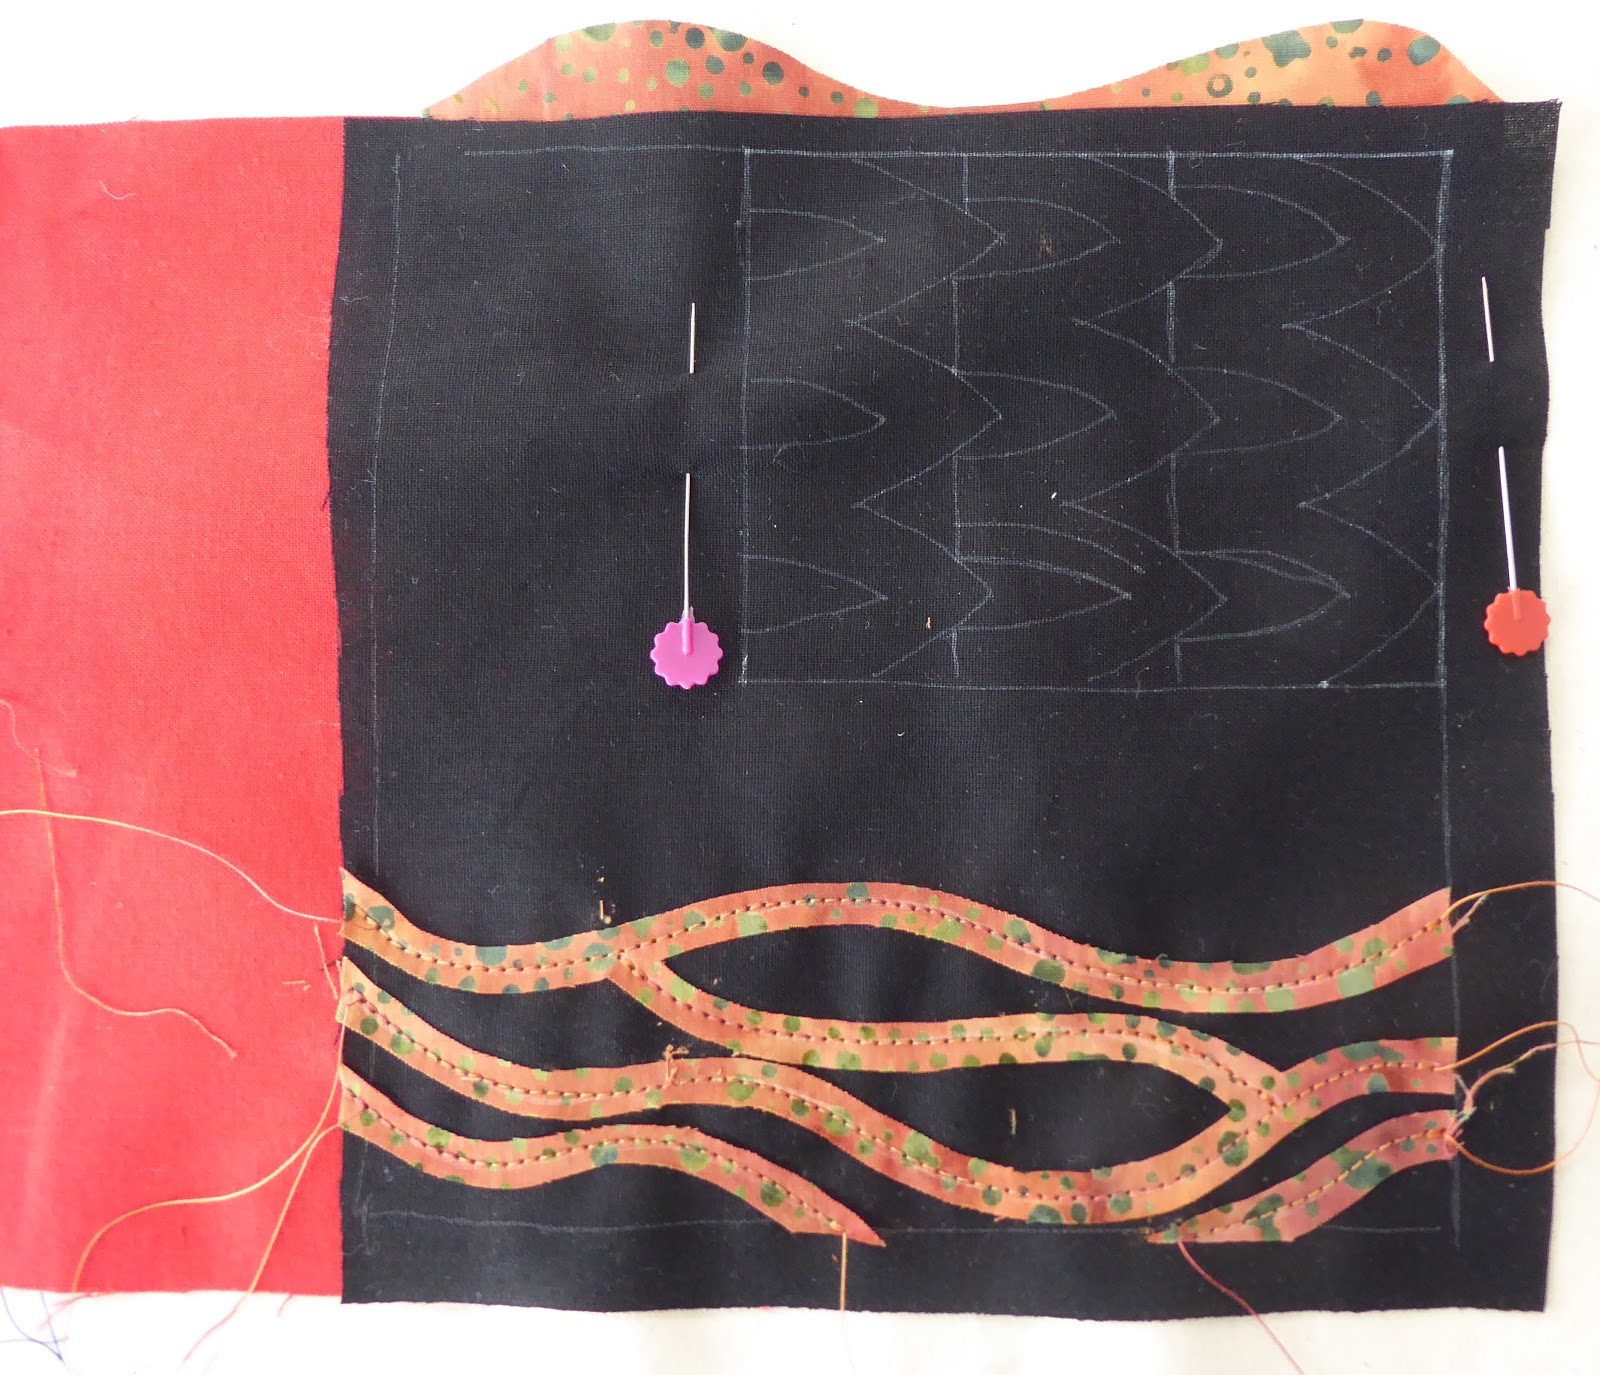
There were a few more layers to manage with the next 'sandwich' of fabrics, which I carefully placed, pinned & began to sew the outline through in the next stage.

The first lot of cutting back began.  I really like those lines.  I also like that an image like this gives no real idea of how the finished piece will be.

More cutting back & more stitching through.

At last the design revealed itself.
And I wasn't happy. It was too heavy in the base & the black didn't relate to the buds & flower.  The black & white fabric perfectly replicates the salvia's leaf pattern, which is why I wanted to use it.  Sigh! What was I going to do to try & get a more cohesive balance.

I began by adding black stitching into the stem & flower features.
 It still needed something.

I unpicked part of the black outline from the base fabric & cut the fabric along it's irregular line.  This softened the appearance.

I cropped it with a frame to see whether removing more of the heavy black would improve it & I believe it does.

This is where I left it, as the day had slipped rapidly away & I needed to get on with other tasks.

This is not an outcome that excites me.

However, what I did with it next does!  Using my mobile phone and a handy little app called 'Layout', this boring little piece inspired by salvia became.....

...this!  I LIKE this! WOW!  What an energetic & interesting repeat pattern this has become.

Goodbye Mrs Stroppy!  I am much h-APP-ier!!